


This Tutorial Created with Psp x12 It can be done in other versions


Thankyou very much Sophie{Evanescence Graphisme}for your beautiful Translate to français


Materials
Narah_Mask_0942
Sylvie Ervan Women tube
Women tube Web
Flower tube Web
Bird tube Web
Robert DiorHomme PNG7
LoveAccident text Canan
LoveAccident-Canan-1
LoveAccident-Canan-2
LoveAccident-Canan-2
LoveAccident-Canan-3
Materials

Alternatif Link

Materials
Alternatif Link
Plugins
Mura Pro - Seamless
Todiaes - Grey Removing BOOST
Simple - Pizza Slince Mirror
Mehdi - Weaver
Rorshack Filters - Ripleyer
Flaming Pearl - Flood
Filters Unlimited 2.0 - Simple - Diamond
Todiaes - What are you
MuRa's Meister - Copies
AAA Frames - Foto Frame
Mura Pro - Seamless
Todiaes - Grey Removing BOOST
Simple - Pizza Slince Mirror
Mehdi - Weaver
Rorshack Filters - Ripleyer
Flaming Pearl - Flood
Filters Unlimited 2.0 - Simple - Diamond
Todiaes - What are you
MuRa's Meister - Copies
AAA Frames - Foto Frame
Preparation
Before you began to The Lesson
Save the Selection in Selections in Psp
Then Open Tubes and Mask İn Psp
Save the Selection in Selections in Psp
Then Open Tubes and Mask İn Psp
You can change Blend Modes according your color
Foreground Color #cb5089
Background Color #ede5b7
Background Color #ede5b7
Other Color #c3c79f


Let's Start
1-Open Transpant New İmage 900x600
2-Selections - Select All
3-Open Women tube Web
1-Open Transpant New İmage 900x600
2-Selections - Select All
3-Open Women tube Web
4-Edit - Copy
5-Edit - Paste in to Selections
6-Selections - Selection None
7-Adjust - Blur - Gaussian Blur {Radius 30}

8-Layer - Duplicate
9-İmage - Mirror
10-Layers - Merge - Merge Visible {Merged Layer}
______________________________________
11-Layers - New Raster Layer
5-Edit - Paste in to Selections
6-Selections - Selection None
7-Adjust - Blur - Gaussian Blur {Radius 30}

8-Layer - Duplicate
9-İmage - Mirror
10-Layers - Merge - Merge Visible {Merged Layer}
______________________________________
11-Layers - New Raster Layer
12-Fill with Foreground color #cb5089
13-Open mask Narah_Mask_0942
14-Layers - New Mask Layer From İmage
13-Open mask Narah_Mask_0942
14-Layers - New Mask Layer From İmage
Source Luminance cheked İnvert mask data NOT cheked
15-Layers - Merge - Merge Group {Group - Raster 1}
16-Effects - Plugins - Mura Pro - Seamless
15-Layers - Merge - Merge Group {Group - Raster 1}
16-Effects - Plugins - Mura Pro - Seamless


17-Effects - Plugins - Todiaes - Grey Removing BOOST
18-Effects - Plugins - Simple - Pizza Slince Mirror
Repead 2 Time
19-Adjust - Sharpness - Sharpen
20-Layers - Duplicate {Copy of Group - Raster 1}
Change Blend Mode This Layer Luminance Legacy
______________________________________________________
21-Layers - New Raster Layer

22-Selections Load / Save Selection Load Selection From Disk LoveAccident-Canan-1

23-Fill with Background Color #ede5b7
24-Selections - Selection None
25-Effects - Plugins - Mehdi - Weaver

26-Effects - Plugins - Rorshack Filters - Ripleyer

Change Blend Mode this Layer Multiply
27-Layers - Duplicate
28-İmage - Mirror
29-Layers - Merge - Merge Down
____________________________________________________
30-Selections Load / Save Selection Load Selection From Disk LoveAccident-Canan-2

31-Layers - New Raster Layer
32-Fill with Other Color #c3c79f
Selections - Select None
33-Effects - İmage Effects - Seamles Tiling

34-Edit - Repead Seamles Tiling
35-Adjust - Softness - Soften More
36-Effects - Distortion Effects - Polar Coordinates Rectangular to Polar and Repead cheked


37-Effects - 3D Effects - Drop Shadow 7 / 7 / 65 / 40.00

38-Effects - Plugins - Flaming Pearl - Flood

________________________________________________
Open Flower Tube Web
39-Edit - Copy
40-Edit - Paste as New Layer
41-Effects - İmage Effects - Ofset 83 / 79

42-Layers - Arrange - Move Down
Click To Top Layer_
_____________________________________________
Open Bird tube Web
43-Edit - Copy
44-Edit - Paste as New Layer
45- İmage Resize % 20
46-İmage Effects Ofset 276 / 172

47-Layers - Duplicate
48-İmage Resize % 75
NO need to move
49-Layers - Merge - Merge Down
__________________________________________
51-Selections Load / Save Selection Load Selection From Disk LoveAccident-Canan-3

52-Fill with Background color #ede5b7
53-Selections - Select None
54-Effects - Plugins - Filters Unlimited 2.0 - Simple - Diamond

Change Blend Mode this Layer Multipy and the Opacity to 15
if you used onother color you must play with opacity and blend mode
55-Layers - Duplicate
56-İmage - Mirror
57-Layers - Merge - Merge Down
58-Effects - Plugins - Todiaes - What are you? Xdose 55

59-Layers - Merge all {Flatten}
____________________________________
60-Window - Duplicate
61-Resize This Duplicate İmage % 30
_____________________________________
62-Return back to Orginal İmage and Aktive it
63-Layers - Duplicate
64-İmage - Resize % 80
65-Selections - Select All
66-Selections - Float
67-Selections - Defloat
68-Selections - Modify - Select Selection Borders İnside cheked- Border with 15 - Anti alias Cheked

69-Layers - New Raster Layer
70-Fill with Background Color #ede5b7
71-Selections - Select None
Change Opacity 50
72-Layers - Merge - Merge Down
73-Effects - 3D Effects - Drop Shadow same parametres 7 / 7 / 65 / 40.00
_____________________________________
Click to Bottom Layer
74-Effects - Reflections Effect - Kaleidoscope

Click to Top Layer
75-Effects - Plugins - Flaming Pearl - Flood Same Parametres
_____________________________________________________________
Click top Layer and Back to your small İmage on STEP 61
76-Selections - Select All
77-Selections - Modify - Select Selections Borders
İnside cheked- 15 Anti alias cheked {same parametres}
78-Layers - New Raster Layer
79-Fill with Background Color #ede5b7
80- Selections - Select None
Change Opacity 50
81-Layers - Merge Merge Down
82-Edit - Copy
Back to your Orginal İmage
83-Edit - Paste as New Layer
78-Layers - New Raster Layer
79-Fill with Background Color #ede5b7
80- Selections - Select None
Change Opacity 50
81-Layers - Merge Merge Down
82-Edit - Copy
Back to your Orginal İmage
83-Edit - Paste as New Layer

84-Effects - Plugins - MuRas Miester - Copies

85-Effects - İmage Effects - Ofset -80 /0

___________________________________________________________
Open your Sylvia Ervan Women tube
87-Edit - Copy
88-Edit - Paste as New Layer
89-İmage - Mirror
Drag it left look the Orginal İmage
90-Effects - 3D Effects - Drop Shadow 3/3/ 65/ 50 Color black
 _____________________________________________________
Open Rbert Dior Homme Png
91- Edit - Copy
92-Edit - Paste as New Layer
İmage Resize %60
Drag it Right your İmage
Change Opacity of this Layer 80
93-Effects - Plugins - Flaming Pearl - Flood Same Parametres
__________________________________
94-Click Copy of Raster 1

95-Aktive Eraser Tool
{now must Clean the Light Border back side}
96-Layers - Merge - Merge All {Flatten}
_________________________________
Open Love Accident Text Canan
90-Effects - 3D Effects - Drop Shadow 3/3/ 65/ 50 Color black

Open Rbert Dior Homme Png
91- Edit - Copy
92-Edit - Paste as New Layer
İmage Resize %60
Drag it Right your İmage
Change Opacity of this Layer 80
93-Effects - Plugins - Flaming Pearl - Flood Same Parametres
__________________________________
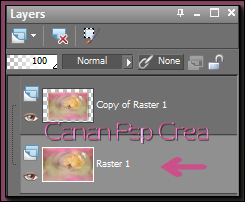
94-Click Copy of Raster 1

95-Aktive Eraser Tool
{now must Clean the Light Border back side}
96-Layers - Merge - Merge All {Flatten}
_________________________________
Open Love Accident Text Canan
97-Edit - Copy
Drag it to right corner look the Orginal İmage
_____________________________
98-Layers Merge Merge all {Flatten}99-Effects - Plugins - AAA Frames - Foto Frame 15

100-Add your Name or Watermarkt
101-Save JPG
_____________________________
98-Layers Merge Merge all {Flatten}99-Effects - Plugins - AAA Frames - Foto Frame 15

100-Add your Name or Watermarkt
101-Save JPG
You're Done
Best Regardes
1 February 2016
1 February 2016
please your versions here 
This tutorial Written By Canan Kaya No to copy and shared on every web..
Onother versions


Yours Version


Thankyou Airi Ollila


Thankyou Kata Kiss
 Thankyou Mieke Poelakker
 Thankyou Clair
 Thankyou Coby Martijn
 Teşekkür ederim Seyran version 1
 Seyran version 2
 Thankyou Helma Murrer


Hiç yorum yok:
Yorum Gönder