


Materials
Ildiko_Desings_Created@Mask_&_ildiko_kjk_1-30 (34)
Narah_mask_0781
Deko-Canan
5 Selections
LoveinWinter-text1
LoveinWinter-text2
Tubtatie_Mist_Chrstmas-landscape
woman_332_franiemargot
Man Tube from web
Materials

Alternatif Link
Plugins
VanDerLee - UnPlugged-Xv2.0
simple - Pizza Slice Mirror
Todiaes - Blast'em
MuRa's Meister - Perspective Tiling 1.1
MuRa'S Meister - Cloud
Eye Candy 5 Impact - Perspective Shadow
Mehdi - Weaver
Eye Candy5 Nature - Snow-Drift
AAA Frames - Foto Frame
VanDerLee - UnPlugged-Xv2.0
simple - Pizza Slice Mirror
Todiaes - Blast'em
MuRa's Meister - Perspective Tiling 1.1
MuRa'S Meister - Cloud
Eye Candy 5 Impact - Perspective Shadow
Mehdi - Weaver
Eye Candy5 Nature - Snow-Drift
AAA Frames - Foto Frame
This Tutorial Created with Psp x12
Before you began To The Lesson
Save the Selection in Selections in Psp
Then Open Tubes and Mask İn Psp
Before you began To The Lesson
Save the Selection in Selections in Psp
Then Open Tubes and Mask İn Psp
Double click Eye Candy Presets it will loaded automatically
You can change Blend Modes according your color
Lets Start


Foreground color #1f130f
Background color #e2b78a
Onother Color #ffffff
Make gradient with Foreground & Background colors angel 45 repeats 5 Style Linear

1-Open new İmage 900x550
2-Fill with your gradient
3-Effects > İmage Effect > Seamless Tiling

4-Ajust> Sharpness > Sharpen More
5-Layers > Duplicate
6-İmage > Mirror
7-Layer Properties This Layer to 50

8-Layers > Merge > Merge Down
________________________________________
9-Layers > New Raster Layer
10-Fill with Foreground Color #1f130f
11-Layers > New Mask Layer > From İmage

Ildiko_Desings_Created@Mask_&_ildiko_kjk_1-30 (34) from image
12-Layers > Merge > Merge Group
13-Effects > İmage Effect > Ofset 50 / 0

14-Effects > Edge Effect > Enhance
________________________________________
15-Layers > New Raster Layer
16-Selections - Load/Save Selection - Load Selection From Disk -LoveinWinter-Canan-1


20-Change Blend mode this Layer to Soft Light
21-Layers > Arrange > Move Down
_________________________________________
21-Layers > Arrange > Move Down
_________________________________________
Click to top Layer
22-Layers > New Raster Layer
23-Change the Background color to white #ffffff
24-Selections - Load/Save Selection - Load Selection From Disk -LoveinWinter-Canan-2

25-Fill this select with white #ffffff

28-Repeat this step at 3 times
29-Adjust> Sharpness > Sharpen
29-Adjust> Sharpness > Sharpen
________________________________________
30-Selections - Load/Save Selection - Load Selection From Disk -LoveinWinter-Canan-3

31-press Delete key from your keyboard
32-Click to the Bottom Layer
33-Promete selections To Layer
34-Selections > Select None
35-Layers > Arrange > Bring To Top
36-change Blend Mode (Soft Light )
37-Effects > Simple > Pizza Slice Mirror
38-Effects > Edge Effect > Enhance
39-Effects > İmage Effect > Ofset -390 / 120

40-Layers > Duplicate
41-İmage > Mirror
42-İmage Flip
43-İmage > Mirror
44-Layers > Merge > Merge Down
41-İmage > Mirror
42-İmage Flip
43-İmage > Mirror
44-Layers > Merge > Merge Down
45-Layers > Duplicate
46-Click on the Orginal Layer
47-Effects> Distortion Effect > Wind
from Right / 90

48-Change Blend mode Multipy
______________________________________
49-Click on the top Layer
50-Open tube Tubtatie_Mist_Chrstmas-landscape
51-Edit > Copy
52-Edit > Paste as New Layer
(must colorize it)
53-Effects > İmage Effect > Ofset 0 / 59


57-Adjust > Blur > Motion Blur - strange 55


58-Click on the Top Layer [Copy of Raster 4]
59-Ajust> Sharpness > Sharpen
60-Click on the Layer (Copy of Promoted Selection)
61-Layers Arrange Bring To Top
62-Selections> Select all
63-Selections > Float
64-Selections > Defloat
65-Selections > Modify > Select Selection Borders 1 pixel

66-Fill with Foreground color #1f130f
67-Selections > Selecton None
___________________________________________
68-Step on Layer Raster 3
69-Layers > Duplicate

70-Effects > MuRa's Filter Meister > Perspective Tiling 1.1

71-Ajust> Sharpness > Sharpen
72-Change Blend Mode to Screen
72-Change Blend Mode to Screen
73-Layers > Merge Merge Visible
__________________________________________
74-İmage > Canvas Size 1000 / 600

75-Effects > İmage Effects > Ofset 0 / 30

76-Effects > Distortion Effect > Pinch Strength 30

77-Layers > Duplicate
78-Layers > İmage > Resize (Layer Copy of Merged) %140

79-Layers > Arrange > Send To Bottom
80-Adjust > Blur > Radial Blur


81-Click to the top Layer ( Merged Layer)
82-Effects > 3D Effects > Drop Shadow 5 / 5 / 50 / 24,75 Black


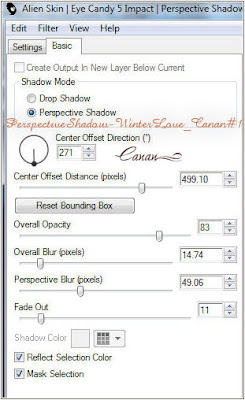
83-Effects > Eye Candy 5 Impact/ Perspective Shadow
Double click to PerspectiveShadow-WinterLove_Canan#1
__________________________________________
Double click to PerspectiveShadow-WinterLove_Canan#1

__________________________________________
84-Layers> New Raster Layer
85-Fill with white #ffffff
86-Layers > New Mask Layer > From İmage
Narah_mask_0781 İnvert mask data not cheked
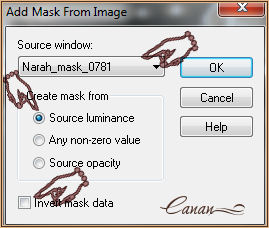
86-Layers > New Mask Layer > From İmage
Narah_mask_0781 İnvert mask data not cheked
88-Change Blend Mode this Layer to Soft Light


__________________________________________________
90-Layers> New Raster Layer
91-Selections - Load/Save Selection - Load Selection From Disk -LoveinWinter-Canan-4

92-Change the opacity to 50 and Fill with white #ffffff
after you fill change the opacity to 100 again
93-Selections > Select None
94-Effects > İmage Effect > Ofset -22 / 0


96-Effects > Edge Effect > Enhance
________________________________________
97-Open tube Deko-Canan edit copy
98-Edit > Paste as new Layer
99-Cange Blend mode > Multiply
No need to move
________________________________________
100-Layers> New Raster Layer
and change the Background color to #e2b78a
101-Selections - Load/Save Selection - Load Selection From Disk -LoveinWinter-Canan-5

102-Effects > MuRa'S Meister > Cloud (default)
103-Selections > Modify > Select Selection Borders 1 Pixel İnside
104-Fill the selected with Foreground color #1f130f
105-Selections > Select None
106-Selections - Load/Save Selection - Load Selection From Disk -LoveinWinter-Canan-5 again
106-Selections - Load/Save Selection - Load Selection From Disk -LoveinWinter-Canan-5 again
107-Open your mantube Resize %60
108-Edit > Copy
109-Edit Paste as New Layer
110-Click Move Tool and but it inside the selections
111-Selections > İnvert
112-Click delete key from yourkeyboard
113-Layers > Merge > Merge Down
114-image > Effect > Ofset -27 / 8
108-Edit > Copy
109-Edit Paste as New Layer
110-Click Move Tool and but it inside the selections
111-Selections > İnvert
112-Click delete key from yourkeyboard
113-Layers > Merge > Merge Down
114-image > Effect > Ofset -27 / 8

115-Effects > Reflections Effect > Feedback

(İf you need change blend mode to Luminance Legacy )
116-Effects > Eye Candy 5 Impact/ Perspective Shadow
PerspectiveShadow-WinterLove_Canan#1 again
117-Effects > Eye Candy 5: Nature Snow-Drift-Canan

116-Effects > Eye Candy 5 Impact/ Perspective Shadow
PerspectiveShadow-WinterLove_Canan#1 again
117-Effects > Eye Candy 5: Nature Snow-Drift-Canan

______________________________________
118-Open woman_332_franiemargot-1
119-Edit > Copy
120-Edit > Paste as new Layer
placed to Right your image
121-Ajust> Sharpness > Sharpen
122-Effects > Eye Candy 5 Impact/ Perspective Shadow
choose PerspectiveShadow-WinterLove_Canan#1 or Drop Shadow, Blurry as your image
______________________________________
123-Open tube winterinlovetext1
124-Edit > Copy
125-Edit > Paste as new Layer
126-Effects > İmage Effect > Ofset -69/ -210

128-İmage > Add borders 1 pixel white Color #ffffff
129-İmage > Add borders 45 pixel Backgraund Color #e2b78a
130-İmage > Add borders 1 pixel white Color #ffffff
131-Effects > AAA Frames > Foto Frame

132-Add your Name or your Watermarkt
133-İmage Resize 900 pixels all Layers checked
135-Edit > Copy winterinlovetext2
136-Edit > Paste as new Layer
137-placed to the top your image
Layers Merge Merge all( Flatten)
and you're done
With my Love
January 2016
This tutorial Written By Canan Kaya No to copy and shared on every web..
Onother versions


Your Versions

Güzel versionunuz için Teşekkür ederim Tamer bey
 Very beautiful version Thankyou Kata Kiss


Very beautiful version thankyou Terna Katalin


Very beautiful version thankyou Rasta Marley


Güzel versionunuz için teşekkür ederim Seyran
 Very beautiful version thankyou Evanescence Graphisme
 Very beautiful version thankyou Clair Chaboud
 Very beautiful version thankyou Ibe Stoiler version 1
 Very beautiful version thankyou Ibe Stoiler version 2
 Very beautiful version thankyou Sylviane Van Costenoble
 Very beautiful version thankyou Francis5931


Very beautiful version thankyou Ria van Schaagen

Very beautiful version thankyou Marijke Van Rahon

Very beautiful version thankyou Coby Martijn